
Toilets like mobile phones are pretty standard items that everyone is expected to understand how they run. You should be able to fix minor flushing problems, return the lid to the tank, and inspect simple leakage problems and other water problems.
Speaking of water problems, you really need to know how to turn off the water to the toilet. Why? You ask because every other toilet repair problem might need you to turn the water off and flush the tank before the fixing process begins.
Problems That Could Necessitate Turning Off the Water
There is no need to disconnect water from your toilet when everything is running okay. However, there are two incidents that could warrant a shut-off. The first one is toilet replacement, and the second one is repairing leaks both in the bowl and tank.
How to Shut Off Water to a Toilet
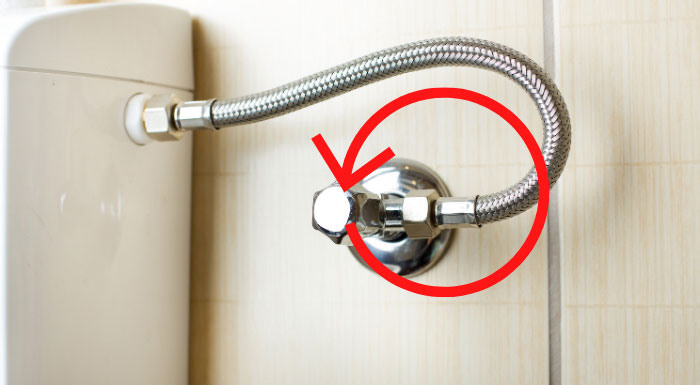
Step one: Look for a plumbing line emanating either from the ground or on the wall behind the toilet. This line connects to the water tank.
Step two: Along the plumbing line, sport something that looks like a knob connecting the plumbing pipe to the toilet tank. Now, turn that knob in the clockwise direction until you can’t anymore. Be mindful of the narrow space as some bathrooms are pretty small.
Bingo! You just cut off water flow to your toilet in less than 10 seconds. Not that hard, right? If you wish to turn it back on, just grab the same knob and turn it anticlockwise.
What if the valve, for some reason, malfunctions and cannot stop the water flow? In this case, you have no choice but to locate the main switch that cuts off the water in your house. You can check out YouTube clips to learn how to turn off water to the toilet in case you want to work alongside an instructors’ steps.
Handy Hacks for Fixing Leaking Toilet Water Tanks
If your toilet is leaking from the water tank, then turning off water flow to the toilet through the valve can be tedious, especially if you are resorting to these hacks as a way to stop flooding in the bathroom.
One useful hack that can help with toilet water leaks is the hanger wire trick. To do this, get a wire hanger and cut the lower horizontal section using pliers or anything that can do that. Take that wire and pass it under the floater to lift its position. With the float in the middle, hang both ends of the wire to the top part of the tank. That’s all.
However, you need to understand that using a hanger wire to stop water leaks means the toilet tank lid might not go back to the top, and therefore you have to stash it away-possibly in the store. If the problem is the tank parts, then it could be time to look for toilet repair kits.
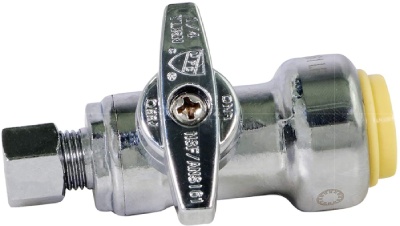
Fixing Stuck Toilet Shut Off Valve
A lot of times, toilet shut off valves will get stuck when you turn them either on or off. If this happens, there is a possibility of mineral buildup that is getting in the way of smooth operation.
To fix the valve, you will need Philip’s head screwdriver, a small towel or a sock, a can of WD-40 (or any other anti-corrosion spray), and a bowl of hot water. First, using the screwdriver, put it at the center of the screw in the knob and try to ensure it is tight enough.
Next, dip the towel or sock in hot water and place it on top of the valve and the stem connecting to the knob. Let the sock stay there for about 5 minutes. The longer, the better. You want to ensure enough heat gets into the metallic parts. This trick works better on cold lines.
Now, grab the WD-40 or any other anti-corrosion spray and sprinkle some between the joint body and valve stem, so it sips inside the shut-off valve. Let it work up the rust for between 10 to 60 minutes.
And now to the last step of finding out if the valve is unstuck. To do that, grab the knob and more a little bit to the right and then to the left. Don’t use too much force; just flow with it. As you get some movement, keep doing that until you can get the valve to fully open and close.
Main Water Valve Won’t Shut Off Water
Yes, this happens. When the valve to your main water supply is fully turned off, but there’s still some water dripping, the issue could be that the packing nut is loose or the flat rubber washer inside the valve is either missing or is deteriorating.
What you want to do is grab an adjustable wrench and place it on the packing nut and turn it in the clockwise direction by about an eighth to a quarter. Just like that, and you are done.
Now, to replace the flat rubber washer, place your adjustable wrench on the packing nut (usually the second from the handle) and turn it counter-clockwise. This will remove the stem entirely from the valve body. Remember to have a bucket under so any remaining water can flow into it.
As you inspect the washer, you can see some black specks or rust on it and the screw holding the washer in place. Now, since the washer is rubber, you can chip it away to reveal more screw length or torch it. Both ways can work. Now you can hold onto the screw and get it out.
The old washer is gone, and it’s time to replace the new one. Since you have the shutoff valve in hand, it is easier to carry it to the store and get a couple of nice fitting washers and screws for it. Put the washer back and screw it up just as the old one was. Lastly, reinstall the valve stem back to the body and tighten it up with the wrench.
If you open your water, there should be no more droplets coming out of the valve. Check out this helpful video guide for graphically detailed instructions.
Wrap Up
Every once in a while, your toilet will experience water droplets either from the water tank or the shut-off valve. When that happens, you need to address the water tank, shut off the valve or your main water inlet.
The good news is, these parts have very few moving parts and that makes it easy to fix the problem yourself. With Covid making it hard for plumbers and other professionals to visit, it is time you learn how to fix them, and all the instructions and helpful resources are already in this article.
The easy fix solutions on how to turn off water to the toilet will turn your troubles into jubilation and at the same time save you time and money. Go ahead and give it a try. If DIY is not your cup of tea, then let a professional help you out.
Related Resources: